Choosing the right pair of binoculars can be a formidable task. Do a fast internet search, and you’ll quickly find dozens of manufacturers producing an extensive line of binoculars with many different options and features available.
Making the correct choice now will make a big difference over the long run, so before you open your wallet and start forking over your hard-earned cash, there are some things to keep in mind.
When purchasing binoculars, some important factors to consider are price, magnification, focus distance, objective lens size, prism type, lens coating, and field of view. Additionally, look for binoculars with a durable design, waterproof and fog proof lenses, and an ergonomic grip.
I needed new binoculars, so I did my due diligence. After hours of reading through many web pages, I compiled this list to help explain the different binocular features and their meaning. With a basic understanding of binocular terminologies and details, you will better understand what to look for when selecting a pair of binoculars.
Binoculars are perfect when you wish to view something up close with greater detail. Whether camping, hiking, hunting, bird watching, or stargazing, finding the right pair of binoculars for your specific needs is the key that will unlock many hours of viewing pleasure. You can read my review of the binoculars I purchased here.
1. Price
Decide on a price range you’re prepared to spend on a pair of binoculars. Prices run the gamut from the least expensive budget models costing around $100 to the high-end ones that can easily reach the $1,500 mark and more.
Several contributing factors account for the price variation. For example, a well-known and respected brand name, an innovative design, the quality of the components used, the number of optical coatings applied, the use of premium glass, and where and how they’re manufactured all help determine the price.
We all want to get the best binoculars for the money we spend. So should you automatically rule out the lower-cost models and go for the higher end? No, not at all. If you’re on a tight budget, you only need binoculars for occasional use, or you want to spend the money on something other than a high-end pair; then a lower-cost binocular might be the way to go.
Plenty of great options are available in the $100 to $250 range. So consider when, where, and how often you plan to use a pair of binoculars. The best value for the money at any price will be binoculars that are well built, have quality parts, provide a sharp, vivid image, and a pair that makes you happy.
2. Magnification Power
The purpose of binoculars is to magnify distant objects by making them appear closer and larger, thus allowing us to take a better look than we could with our naked eye. So how do we determine how much binoculars will magnify an object?
That’s an easy task. The manufacturer always places the magnifying number on each pair of binoculars produced. For example, when you see a number like 8x42mm on a binocular, the first number always indicates the magnification power. Therefore, anything viewed at that power will appear to be eight times larger than viewed by the naked eye at the same distance.
The objective lens diameter is the second of the two numbers; I’ll cover that later. Maybe you’re thinking, I’m going to buy the highest magnification binoculars I can afford. That makes sense, right? Wrong; bigger is not always better.
While higher magnification improves image detail at longer distances, there are other factors to consider. When hand holding a higher magnification binocular, the amount your hand shakes comes into play. It’s harder to keep the higher magnification steady without getting a shaky image.
Higher magnification also reduces the binoculars’ close focus distance and generally narrows the field of view. Finding and following the action is easier with a wide field of view, especially when bird-watching or glassing a moving animal.
A pair of binoculars with a magnification in the 7x to 10x range would be suitable for general all-around use. They will have enough magnification for most viewing situations while keeping noticeable handshake minimal.
3. Objective Lens Diameter
In our 8x42mm example above, the second number refers to the objective lens diameter in millimeters. The objective lens is on the front of the binoculars; it’s the lens facing what you are viewing. The size of the objective lens defines the amount of light gathered by the binoculars.
Compare two pairs of binoculars with the exact specifications and the same magnification. The binocular with the larger objective lens will capture more light and generally give a sharper and brighter image, even though the magnification is the same in both pairs.
However, there is a trade-off for those larger lenses. The larger lenses are heavier. A couple of ounces doesn’t sound like much, but after several hours that small amount of weight begins to add up. That’s something to consider if your primary use involves carrying or holding them for any length of time.
During my research, I discovered that many people like the 42mm size. It offers a good trade-off between portability and a bright image. Generally, the smaller lenses are lighter but diminish the light-gathering ability; the larger lenses gather more light but are heavier.
4. Prism Type
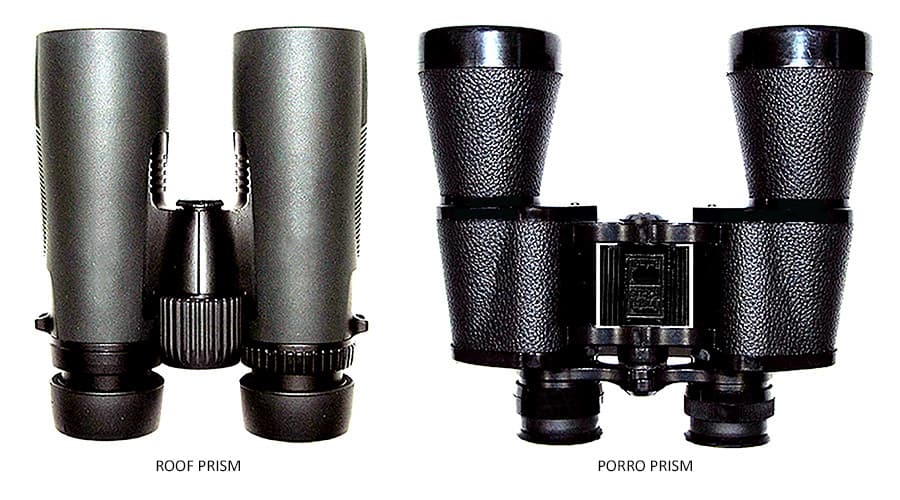
Prisms are optical components used inside binoculars. In simple terms, when an image passes through the objective lens, it’s upside down, and a prism then turns the image right side up. The type of prism used dictates the binoculars’ basic shape. Generally, there are two types of prisms used; Porro prisms and roof prisms.
Patented in 1854 and refined in the 1890s, Porro prism binoculars were for years the standard. With Porro prisms, the ocular eyepiece and the objective lens offset each other, giving binoculars that old traditional shape, where the objective lenses are farther apart than the ocular lenses. The exception would be reverse Porros binoculars, where the objective lenses are closer together than the ocular eyepieces.
It’s easy to see why many binocular manufacturers use Porro prisms. They are less complicated to produce, have lower overall costs and offer good optical performance. Although bulkier and heavier, many people still like Porro prism binoculars. They are affordable, easy to hold, provide an excellent image, and generally deliver a wider field of view.
The roof prism likely came to the scene as early as the 1880s. The design places the ocular lens in line with the objective lens. Roof prism binoculars are now very popular and dominate the marketplace. This style is popular because they offer a compact, streamlined design, and their size and weight make them easy to carry.
Therefore, if you want the latest innovative style, outstanding optical performance, and a sleek, compact design, you should expect to pay a higher price for a roof prism binocular than for the Porro. You can attribute the increased cost to several factors; they’re more complicated to build, use high-quality prisms and optical coatings.
Prism Glass
BaK4 (barium crown) and BK7 (borosilicate crown) are types of glass used in binocular prisms. Due to their higher refractive index, BaK4 prisms are believed to be superior to BK7 prisms. They provide a brighter, crisper image and, as a rule, are more expensive than BK7 prisms.
If choosing between the two types, the differences may be insignificant depending on their intended use, but for most general usage, either would be a great choice. As with most things, the quality of either type can vary between manufacturers.
Other Posts of Interest
- Do You Need A Regulator For A Camping Stove?
- What Vans Can You Stand Up In?
- Hymer Aktiv Loft vs. Pleasure-Way Tofino: Which Is Right For You
- Secrets Of Selecting An Inverter For Your Van Build
5. Field Of View
The field of view relates to the width of the area you see when looking through binoculars at 1,000 yards, described in one of two ways, linear field of view or angular field of view. The linear field of view is in feet; the angular field of view is in degrees.
Some but not all binoculars will display the field of view; if not, look through the manufacturer’s specifications to find the information. For example, you should see something resembling this, linear field of view 315 feet at 1000 yards or an angular field of view 6 degrees. Sometimes both are there.
If only one value is there and you wish to calculate the other, all you need to know is that at 1,000 yards, 1 degree equals 52.5 feet. So using our example above, if a pair of binoculars have an angular field of view of 6 degrees, you can calculate the linear field of view by multiplying the degrees by 52.5.
Likewise, if the linear field of view is 315 feet at 1,000 yards and you want the angular, divide the feet by 52.5. You can also calculate the apparent field of view by multiplying the angular field of view of degrees by the binocular magnification.
Why should I care about that? When looking through binoculars with a wider field of view, you can see more of the area, making it faster to find something. It’s advantageous when searching for birds in wooded areas or when glassing for fast-moving small mammals. It also helps if you’re in a moving vehicle or on a pitching and rolling boat. In any of these scenarios, a wider field of view could make finding what you’re searching for easier.
Binoculars with higher magnification powers usually have a smaller field of view; lower magnification powers typically have a wider field of view. Therefore, when choosing a pair of binoculars, consider your intended use and the field of view that best suits your needs.
6. Optical Coating
When light passes through the binocular lens, about five percent of it reflects; this light reduction causes several undesirable effects. So manufacturers apply chemical coatings to the lens surfaces to minimize reflection and allow more light to transfer through. The result is a bright image with improved contrast.
Lens coatings are essential when you consider there may be up to 16 air-to-glass surfaces in binoculars with light reflected each time it passes through one. Applying lens coatings reduces the amount of reflected light, making the image more detailed and sharper with good natural color representation.
Magnesium fluoride is one of the standard coatings used for binocular optics. Nearly all binoculars today have some coating applied to some of the air-to-glass surfaces. Before purchasing binoculars, check the manufacturer’s specifications to see the type of coatings used. Then decide if those binoculars are adequate for your needs.
The more coatings per lens surface, the better the optical efficiency. Listed below are the typical lens coatings terms you’re likely to come across.
- Coated: (C) a single layer of anti-reflective coating on one or more surfaces.
- Fully coated: (FC) a single layer of anti-reflective coating on all air-to-glass lenses.
- Multi-coated: (MC) a multi-layer of anti-reflective coatings applied to one or more surfaces
- Fully multi-coated: (FMC) a multi-layer of anti-reflective coatings on all air-to-glass surfaces.
- Phase correction coated: (PC) only used on roof prism binoculars, not needed on Porro prisms binoculars.
7. Exit Pupil
The exit pupil is the binocular objective lens diameter divided by the magnifying power. Going back to our 8x42mm example, if you divide the objective lens size, in this case, 42, by the magnifying power of 8, the result is a 5.25mm exit pupil. That’s the diameter of the column of light that comes from the eyepiece and hits the eye.
The best practice is to be sure the diameter of the exit pupil is equal to or larger than the eye pupil. This is because pupil dilation varies depending on the light conditions, somewhere around 3mm in diameter in bright light to 7mm in low light.
In bright conditions, if the binocular’s exit pupil is 3mm or larger, the image viewed will be easy to see and as bright as when viewed with the naked eye. Conversely, if the binocular’s exit pupil is smaller than your eye’s pupil, the image will be dimmer in low light conditions.
The larger the exit pupil diameter, the more light that’s able to pass through and be available to the eye. In the examples below, you’ll see that a larger exit pupil performs better in low-light viewing conditions, such as under a shaded forest canopy, at twilight, or stargazing at night.
In bright light
A 7x50mm binocular has an exit pupil of 7.14mm. The average eye diameter in bright light is about 3mm. Therefore, the column of light from the binocular is larger than the pupil size resulting in a bright image. Even though the iris blocks more than half the light, it’s no problem because of the large amount of light overall. Some consider anything more than what the eye can take in as wasted light.
A 10x25mm binocular has an exit pupil of 2.5mm, which is almost the same size as the pupil in bright light. So again, the image should be as bright as the 7x50mm binocular even though the exit pupil size is smaller because the column of light almost fills the eye pupil.
In low light
The 7x50mm binocular’s exit pupil of 7.14mm is about the same size as the 7mm pupil in low light. Again, the column of light fills the pupil diameter resulting in a bright image even in low-light conditions.
With the 10x25mm pair of binoculars, the exit pupil is 2.5mm. The pupil diameter in low light is 7mm. Because a smaller column of light is available, only filling a little more than one-third of the pupil’s diameter, the image would be dimmer.
8. Minimum Focus Distance
Minimum focus distance or close focus is the nearest point you can focus binoculars. Most people use binoculars to view distant objects. You can also use a binocular to view objects up close; this may or may not be necessary for you. It will depend on your intended use of the binoculars.
Magnification at a close distance is beneficial for studying birds up close. It can be especially helpful to observe distinctive stripes, spots, eye color, and color patterns. It’s also handy when trying to identify insects and butterflies.
Normal minimum focus distance depends upon the manufacturer and the binocular design, but anything around 6 feet is considered acceptable. Therefore, check the minimum focus distance if you want to see fine details up close that are not easily visible to the naked eye.
9. Eye Relief
Over half of Americans wear eyeglasses; if you’re one of them, then knowing the binoculars eye relief is essential. Eye relief refers to how far back your eye can be from the ocular eyepiece and still see the whole image without vignetting. Vignetting decreases an image’s brightness around the outer edge compared to the image center.
Vignetting happens when your eyeglasses keep the binoculars’ eyepiece too far from your eyes. Older binoculars compensated for that distance with eyecups that folded back. However, most binoculars today have eyecups that adjust up and down by turning, allowing you to dial-in the correct distance.
The recommended minimum amount of binocular eye relief when wearing eyeglasses is 14 to 15mm more is better, even up to 20mm. Look through the manufacturer’s specifications to find the eye relief information. Also, depending on your prescription, you may be able to use binoculars without eyeglasses by fine-tuning the dioptric adjustment on the binoculars.
If you wear contact lenses or don’t need eyeglasses, you can achieve the correct eye relief distance by fully extending the eyecups.
10. Interpupillary Distance
The interpupillary distance is the spacing between the centers of the pupils of both eyes in millimeters; this space varies from person to person. The average adult interpupillary distance is usually between 54-74mm and between 43-58mm for children.
When looking through the eyepieces, you need to adjust the interpupillary distance if you see two images, vignetting, or an incomplete image. Almost all modern binoculars have some hinge system that’s adjustable to your eye width.
The goal is to center the binocular eyepieces with the center of your pupils. To do this, hold the binoculars as you would with both hands in a normal viewing position. Then focus on a mid-range object and move the two binocular halves closer together or farther apart. The interpupillary distance is adequately adjusted when you see a single circle of light with no distortions.
Check the interpupillary distance on the binocular before you purchase. Some but not all binocular manufacturers will have it listed in their specifications. The range is usually around 55-73mm, which is appropriate for most adults. The interpupillary distance is particularly important if you’re at the high or low end of the range or if you are buying for smaller children.
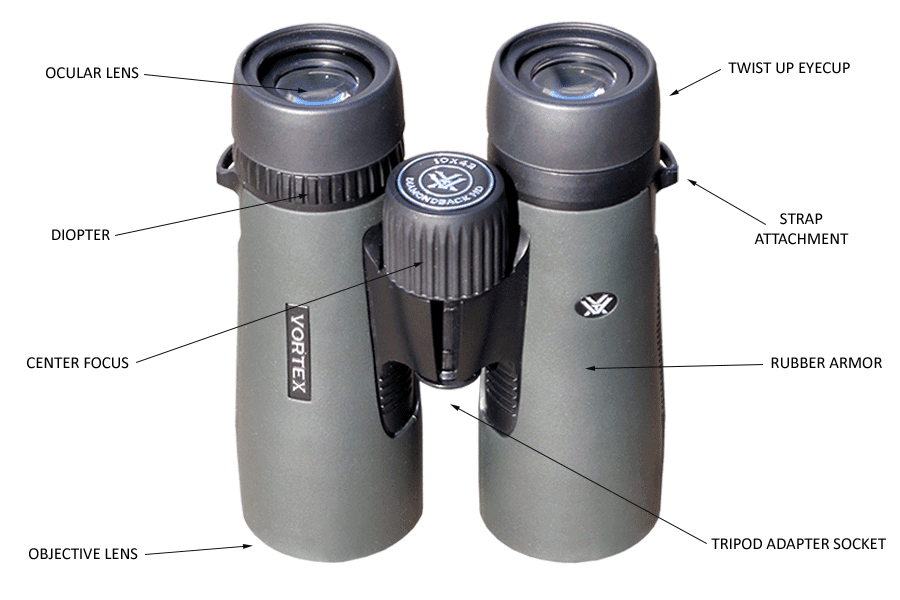
11. Diopter Adjustment
The proper focus of the binoculars is necessary to achieve a sharp, clear image. The diopter adjustment is part of that process. Most people’s eyes have variations between them. That difference may not be noticeable for individuals with good vision, but it may be very discernible when using binoculars.
The diopter adjustment lets you correct that eye difference and bring the binoculars’ view into sharp focus. The diopter adjustment ring is most likely incorporated into the eyepiece of one barrel, or it could be on the center focus wheel, depending on the model.
There should be some marking to show the central position. That could be a zero setting or a centerline marked with a plus and a minus. To begin the focusing process, turn the adjustment ring to the right or the left, stopping at the zero or center mark. Follow the steps below to continue the focusing process.
12. Focusing
There are three primary kinds of focusing systems.
Constant-focus binoculars depend on your eye’s ability to focus clearly at different distances. If you need eyeglasses or contact lenses, it’s essential to wear them when using these binoculars.
They have a fixed focus set by the manufacturer and are designed for clear viewing from about 30-50 feet to infinity, but does vary with model and magnification. Constant-focus binoculars do not work for viewing objects at close range.
Independent-focus binoculars don’t have a center focus wheel. Instead, they have a diopter adjustment on each eyepiece that allows each side of the binocular to focus independently from the other.
Center-focus binoculars have a center-focus wheel when turned, adjusts both sides of the binoculars together. A diopter adjustment is usually on the right eyepiece allowing further adjustment.
Proper focusing is essential to getting a bright clear image from binoculars. Center-focus binoculars are the most popular type, so that’s where we’ll begin; follow these steps to adjust the focus to your eyes.
Start by adjusting the interpupillary distance and diopter adjustment (described above). Then select a stationary object with sufficient detail approximately 30-40 yards away. Next, cover the right objective lens (usually the one with the diopter) with your hand or if you can’t adjust the setting with one hand, then just shut your right eye.
Slowly adjust the center focus wheel until the object on the left side is in sharp focus. Once that’s accomplished, leave the focus wheel in that position until you finish the next step.
Next, cover the left objective lens with your hand; if you can’t adjust the setting with one hand, just shut your left eye. Then, slowly adjust the diopter ring until the object on the right side is in sharp focus.
Both sides are now focused, and the object should be in sharp focus with both eyes. Now you can focus at different distances by adjusting the center focus wheel. No further adjustment is necessary unless your eyes change or someone else uses the binoculars. If the diopter is on the left side, reverse the process.
The adjustment of independent focus binoculars is similar to the procedure listed above.
Start by setting the interpupillary distance and diopter setting. Then select a stationary object. Next, shut your left eye and rotate the right eyepiece/diopter until the object is in sharp focus.
Shut your right eye and rotate the left eyepiece/diopter until the object is in sharp focus. Both sides are now focused, and the object should be in sharp focus with both eyes. You’ll need to repeat the steps to focus on other things or if someone else uses the binoculars.
13. Weatherproofing
Two standard terms used by manufacturers when describing their binoculars’ weatherproofing are water-resistant and waterproof. For a more precise definition of these terms, I went to dictionary.com for the answer.
- Water-resistant: resisting, though not entirely preventing, the penetration of water.
- Waterproof: impervious to water.
Binoculars specified as weather-resistant are not fully waterproof. They can endure short moisture exposure but not prolonged use in wet conditions. If submerged in water, considerable damage can occur.
Binoculars specified as waterproof have O-ring seals that provide a barrier that prevents water and air from entering the interior. The seals also help keep those annoying dust and debris particles out that collect on the lens.
As the definition states above, waterproof is to be impervious to water. Read the manufacturer’s specifications to understand what waterproof means on that model. I looked at several binocular models that said waterproof in the description, but with a little more reading, I found “not for underwater use.”
However, that doesn’t mean they couldn’t withstand water submersion for a short period. It seems reasonable that any quality binoculars fitted with O-ring seals should give reliable performance in all environmental conditions.
While most of us won’t use binoculars underwater, some are fully waterproof. You can submerge them for an extended period and at a greater depth. Most of them will float, and when you’re around water, that’s a good thing, as accidents do tend to happen.
With fog-proof binoculars, the manufacturer removes the air and replaces it with a gas, usually nitrogen or argon. The binocular is then fully sealed to keep the gas contained within. Therefore, most fog-proof binoculars are also waterproof.
Nevertheless, not all waterproof binoculars are fog-proof, the binocular has O-ring seals, but the air inside has not been removed and replaced with gas. With fog-proof binoculars, the internal lenses are sealed and protected against fogging, but the outside ones are not. Fogging on the external lenses occurs when going from a cold environment to a warm one or vice versa.
14. Size And Weight
Binoculars categorized by size generally fall into three primary groups, compact, mid-size, and full-size. When selecting binoculars, there are many options to consider, and their size and weight are important.
Compact Binoculars
Consider binoculars as compact when the objective lens size (the lens facing what you are viewing) is around 26mm or less. Their lighter weight and small size make them ideal for taking along for any outdoor activity. Compact binoculars achieve an excellent balance of size, weight, performance, and cost.
Mid-Size Binoculars
Many seasoned outdoor enthusiasts prefer mid-sized binoculars for their various activities. They’re larger than the compacts making them easier to hold steady. The medium-large objective lens offers outstanding image quality in low-light conditions. Depending on the model, their performance is often comparable to full-size binoculars but without the additional size and weight.
Full-Size Binoculars
Full-size binoculars are the largest and heaviest of the three groups and are considered to be full-size when the objective lenses are 40mm and larger. Full-size binoculars usually have a magnification range of 10x or greater and are suited for long-range viewing. However, their weight makes them tiring to hold for extended periods, so often, a tripod is used, which also helps to lessen any noticeable handshake.
15. Twilight Factor
The twilight factor is a mathematical calculation used to measure the efficiency of binoculars in low-light conditions. To do the math, multiply the magnification by the objective lens size and then the square root of that result. Referring back to our 8x42mm example, 8 times 42 equals 336, and the square root of 336 gives a twilight factor of 18.33.
The greater the twilight factor number, the more efficient the binoculars should be in low-light conditions; based on that assumption, a larger objective lens and higher magnification increases low-light performance.
16. Relative Brightness
Relative brightness is another mathematical calculation to measure binocular brightness; you can calculate it by squaring the exit pupil value. Back to our 8x42mm example, 42 divided by 8 equals an exit pupil value of 5.25, and the square of 5.25 gives a relative brightness of 27.56.
Again the greater the relative brightness number, the brighter the image should be. So using this calculation, an 8x50mm binocular with the same magnification power but with a larger objective lens of 50mm would have a relative brightness of 39.
In my discussion of the twilight factor and relative brightness, I only gave the method to calculate the numbers. There are several more important factors to consider: the quality of the glass, the quality of the coating, the number of lens elements, and the optical design. Therefore, do not make your decision to buy a binocular based on the twilight factor or relative brightness numbers alone.
17. Warranty
An excellent warranty is something that you should consider when purchasing binoculars. Most reputable manufacturers will support their optical products with a notable warranty, which varies from manufacturer to manufacturer, so you’ll need to read their literature to be fully aware of their policies.
The warranty terms will provide the information you need to know if you need repairs. Will they fix or replace the binoculars with no questions asked? Does it matter if you’re the original owner or not? Must you provide proof of ownership or provide a warranty card?
Is there a time limit on the warranty, or is there no time limit? If you damage your binoculars, will they repair or replace them at no charge to you? Also, be sure to understand their policy on gray market binoculars.
It seems reasonable to believe that a company with a great product will stand behind that product with a great warranty, and most will. However, it would be unreasonable to think that any warranty should or would cover binoculars that were lost, stolen, or damaged deliberately.
18. Selecting Binoculars
You now have a good understanding of binocular anatomy and related terminology. The objective is to select the best binoculars for your particular use. Below are some basic guidelines that might be helpful in your selection process.
Bird Watching Binoculars
The goal for bird watchers is to get a close detailed look at the birds they’re observing; binoculars are an indispensable tool to accomplish that. A favorite binocular model for bird watchers is 8x42mm; it has a wide field of view, which is essential when locating birds.
A bright, sharp image allows better identification of specific body markings and other distinguishing features. Other models are 7x36mm, 7x42mm, 8x32mm, 10x42mm, and 10x50mm. A center focus wheel, fog-proof construction, O-ring seals, and fully multi-coated lenses would be preferable for bird watching.
General Use Binoculars
If you want binoculars for various uses, a magnification power of 7x to 10x would be an excellent choice for most activities. Some great features include a center focus wheel, waterproof construction, O-ring seals, and multi-coated lenses.
Look for an objective lens size between 30mm and 42mm. The 7x35mm, 7x42mm, 8x42mm, and 10x42mm models would be worthwhile considering. Binoculars with a 50mm or larger objective lens will increase their size and weight. General-use binoculars should be portable, powerful, and well-adapted for a wide range of different uses.
Hiking And Backpacking Binoculars
Compact binoculars are the right choice when size and weight are a concern. Their lightweight and compact form would make them ideal for most hiking and backpacking outings. My first choice is the magnification power of 8x to 10x and an objective lens of around 25mm.
Other models include 8X20mm, 8x25mm, 8x28mm, 10x25mm, and 10x32mm. Models that are waterproof or fog-proof would be a plus during inclement weather. A rubberized coating helps provide a secure grip and absorbs some of those inevitable bumps and jolts during extended use.
Hunting Binoculars
Hunting is a demanding sport that’s tough on both hunters and equipment. Binoculars need to be able to withstand the abuse of prolonged field use. A couple of good hunting binoculars would be the 8x42mm and 10x42mm models. The 42mm lens offers a reasonable field of view and provides a sharp, clear image.
The 8x42mm is best for hunting in heavy woods, and the 10x42mm is ideal for long-range glassing. Binoculars with multi-coated lenses and a rubberized coating would be advantageous. Another necessity would be O-ring sealed models, purged of air, and gas-filled to eliminate any internal fogging problems.
Stargazing Binoculars
Combine a star-studded night with a good pair of binoculars, and you’ll be amazed by the spectacular beauty seen above. Binoculars allow us a closer view of many celestial objects as well as some man-made orbital objects as they pass overhead; maybe you could catch a glimpse of the space station.
For holding by hand, a magnification of 7x to 10x and an objective lens of 50mm would be excellent; the larger objective lens will gather more light when viewing the night sky. However, larger binoculars such as 15X56mm, 15x70mm, or 20x80mm would be difficult to hold steady by hand and require a stable tripod.
Marine Binoculars
A 7X50mm binocular would be ideal for marine use. On an unstable boat, the lower magnification would provide easier viewing, and the 50mm lens delivers a wide field of view for glassing the horizon. My first choice would be highly visible, fully waterproof, floating binoculars that you can easily see if dropped overboard.
If you need higher magnification, then consider image-stabilizing binoculars. Also, decide if you need a built-in compass or a rangefinder to calculate distance from objects and consider all the available options.
19. Cleaning Binoculars
Do
- Do keep the binoculars in their protective carrying case when not in use.
- Do keep the lens covers on when afield and not in use.
- Do read the manual to see if there are any specific cleaning instructions.
- Do use an optical brush or lens blower to remove any dust and debris.
- Do use a non-abrasive lens cloth specially designed for binoculars.
- Do use a lens-safe cleaning solution and optical paper to clean lenses.
Don’t
- Don’t fog the lenses with your breath before wiping them.
- Don’t use materials that can scratch the surface of a lens.
- Don’t touch the lens. It only leaves oily fingerprints.
- Don’t use an ordinary glass cleaner.
- Don’t blow away dust and debris using compressed air.
- ·Don’t take apart your binoculars to clean internally.
Conclusion
A good pair of binoculars is indispensable for anyone who spends any time outdoors. There’s a lot to consider when choosing binoculars, so I hope this post has provided you with some helpful information for determining what model is best for you.
Whether you purchase from the high-end, low-end, or somewhere in between, the best binoculars will suit your specific needs in a price range you’re happy with and that you’ll consistently use and enjoy.