Adding insulation to a van is the best way to deal with the wide variety of temperatures that you will be camping in throughout the year. Whether you’re trying to stay warm on a freezing night or you want to cool off when it’s blazing hot outside, insulation is an absolute must in a DIY van build.
If you want to learn how to insulate a van floor, you’ve come to the right place. This step-by-step guide will show you everything that you need to know to create a top-notch temperature barrier to maintain the comfort level that you’re looking for all year long.
Throughout this detailed post, you’re going to learn the following:
- One of the best choices for van insulation
- Which tools and supplies you’ll need
- How to install insulation on the floor of your van
- How to deal with mold
- Additional helpful tips
- Common mistakes and more
What Type of Insulation Should You Use?
People use a variety of insulation types when doing a van build. Some of the top choices used to insulate vans include fiberglass batts, spray foam insulation, and Reflectix. These are useful choices for many applications; however, I’m not convinced they are the best solution for this application.
A van is a small confined space, where you will be spending a lot of time either while traveling on the road or sleeping. For potential health concerns, some of these products may not be the best choice. However, let me say there are several low volatile organic compound (VOC) insulation types available.
Before I go into our choice for insulation, I would like to touch on some of the disadvantages of using the products mentioned above, especially if they are not VOC free.
Cons of Fiberglass Batts
The main reason that you should consider not using fiberglass batts is right in the name: fiberglass. This material is known to cause itching, irritation, and lung problems during installation.
You’ll have to wear safety gear to prevent problems during installation. During installation, small pieces of fiberglass will float all around the inside of the van, and it seems nearly impossible to get them all cleaned up. Months later, you will still find small fibers around.
Cons of Spray Foam Insulation
Unfortunately, there are all sorts of harmful chemicals in spray foam insulation. Not only will you need to think about the health risks during installation, but you need to consider the health effects down the road.
Just like fiberglass, you’ll need to wear a mask, safety goggles, gloves, and clothing that covers everything during the installation process. It is messy, and inevitably you always end up getting it someplace that you don’t want it, and it won’t come off.
There is also the problem of getting the same coverage. It may be too thick in some places and too thin in others. In some cases, it may even shrink.
Once you have put it in, there is no changing it later on.
Cons of Reflectix
Quite a few people spray adhesive to the van walls and apply Reflectix directly onto the metal sheeting, and this cuts the effectiveness way down as you need to have an air gap. And it is almost impossible to remove it if you want to after you have applied it this way.
On top of that, Reflectix provides a low R-value, so there are many better options for insulating your van.
Other Posts of Interest
- Camper Vans and Habitation Checks: 7 Things You Must Know
- Do Camper Vans Hold Their Value?
- How To Put Up Curtains In A Camper Van: A Step-By-Step DIY Tutorial
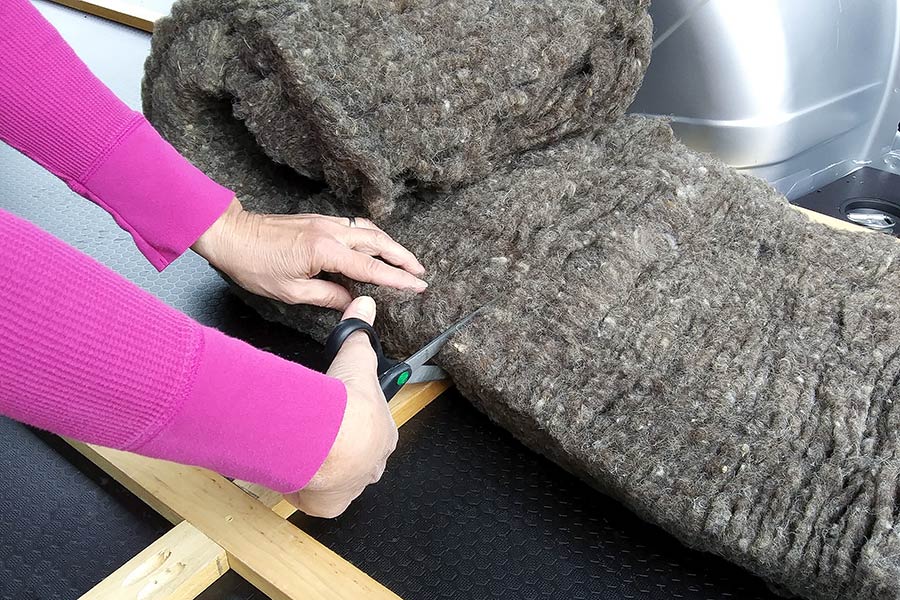
Sheep Wool Insulation
You are probably wondering what we finally selected to use for insulation in our van build. I think that sheep wool insulation is by far the best choice for insulating your van.
I like that it is a natural product made from thousands of sheep, slaving over pastures of nutritious green grass. What’s not to like about that?
Sheep wool insulation comes in rolls, batts, and even loose-fill. It is easy to work with. There is no need for masks, gloves, and any of the other protective clothing needed for alternative types of insulation.
Sheep wool absorbs and releases moisture, making it a highly practical choice for insulation. It does not harm the environment, it is biodegradable, sustainable, is not a health danger, and it is also recyclable.
Not only is sheep wool insulation excellent for its insulation factors, additionally its sound-absorbing qualities make it perfect for soundproofing your van. That’s why they call it, killing two birds with one stone. The noise from the road is reduced considerably with this product making for a much more enjoyable ride.
Also, when you are stealth camping in a 24/7 parking lot or even in a rest area, it cuts down on the outside noise considerably, allowing you to get a better night’s sleep.
Another remarkable quality that wool insulation has it that it is fire resistant. I know after all of this you are thinking, but what are the cons? Sheep wool insulation is more expensive than other forms of insulation, which, if you are trying to stay on a budget, it may be more than you want to spend.
Sheep wool insulation use for van DIY builds gained considerable popularity in the past few years for both its insulation properties and for the lack of off-gassing that contributes to health problems for some individuals.
To learn more about whether sheep wool insulation is right for you, read our post “Is Sheep Wool Insulation Safe?“
Something else that I would like to point out is some people confuse sheep wool with mineral wool, which is an entirely different product. Even though it resembles wool, it is not. Mineral wool can be either rock or slag wool, and they produce it from basalt or blast furnace slag.
Tools and Supplies to Insulate a Van Floor
No matter which type of insulation you chose, you’ll need a variety of tools to get the job done. The first component you need will be the insulation, so do your research before you pick any of them.
Besides the insulation, there are a handful of other necessary supplies; let’s review them below:
- A power drill
- A countersink drill bit (appropriate to screw size)
- Screws (the amount you need depends on the size of your van’s floor)
- A broom and a wet mop
- Furring strips of the appropriate size
- Insulation
- Plywood (or whatever material that you want for the subfloor)
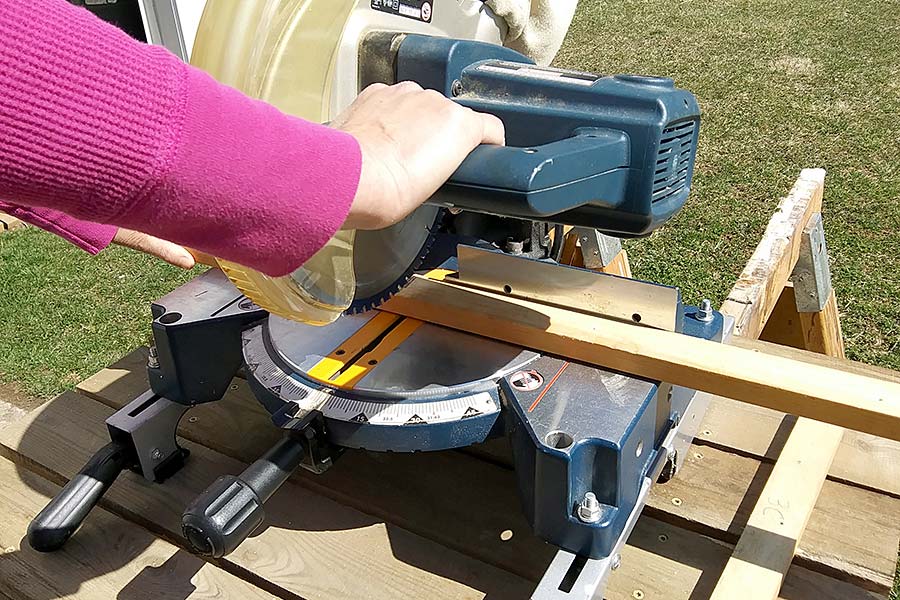
- A chop saw
- A jigsaw
As you can see, there are a few items that you’ll need to get your hands on before you can start the job.
Set a budget before you start the van floor insulation project. Insulation can cost very little or a whole lot of money. Write down everything that you are going to need and stick to the budget.
One of the first things you will need to decide is how thick you want your insulation to be. You can either go with 1 inch or 2 inches. There are a couple of things to take into consideration to decide this. The first will be the height of your van if you have a lower top van you might want to think about going with 1 inch of insulation to give you as much inside height as possible.
The second thing to think about is what time of the year you will be camping if you mainly camp during the warmer times of the year 1 inch is probably the way to go. However, if you do a lot of camping in the winter, then you might want to go with 2 inches because it can get really cold in a van in the winter.
Also, the insulating process might take a couple of days, but just keep working at it, and you will finish up in no time flat.
Note: Some of the steps that you’ll read below are a bit tricky if you don’t have someone helping you. Do your best to ask a friend or family member to assist you during the challenging parts, such as measuring the floor and cutting it out.
How to Install Insulation in the Floor of a Van
Before you begin, you probably will want to have the ceiling and walls insulated and the wheel wells covered with some type of insulating material. It will be a challenge to get this awkward job done, but it will help the wells not to be as cold.
Also, if you are going to do any plumbing, run any wiring, or any other additions, don’t forget to do it before you put the subfloor down. All right, we are now ready to move forward.
Here are the steps to insulate your van floor, start to finish:
Step 1: Clear everything out of the van if there is anything in it that might get in your way. You don’t want to have to stop when you are on a roll to remove items. Also, move the front seats as far forward as they will go. The goal is to make as much open space as you can.
Step 2: Sweep the entire van floor with a broom to clear out dust and other debris. You will follow that up by using a sponge or mop to clean any remaining dirt off of the floor. Let the floor completely dry before you do anything else.
Step 3: Measure the dimensions of your van’s floor. Sketch out a rough plan on a piece of paper in a grid design that will cover the van floor. Try to plan your grid sections evenly; this way, you will be able to cut pieces of insulation in the same size.
Step 4: Cut the furring strips into the correct sizes and connect them together, forming a wood grid over the van floor. You might be able to find furring strips cut to the right thickness, or you might have to rip them to get the correct thickness for the size that you specifically need.
Fasten the furring strips together with screws. You can use the countersink drill bit mentioned above, drill an angled hole on each side of the edge grain of the furring strip, and fasten it to the adjoining piece.
If you are uncertain of the best way to do this, Kreg makes a pocket hole jig that works exceptionally well to join pieces of wood together. It also will come in handy when working on other projects in your van build, such as cabinets.
If you haven’t used this handy tool and would like to see how it works, watch the video below.
We didn’t want to put the grid down with some kind of glue or adhesive, so we just let the wood grid “float” on the van floor. That way, if we want to change or remove the floor sometime at a later date, there wouldn’t be a problem since we didn’t choose the option of gluing it down.
Step 5: Snap a picture of the floor with the grid with your cell phone or take a piece of paper and transfer the location of all the wood framework. That way, you will know where the wood is for later steps. The paper method will probably work the best. You can also use a marker or painter’s tape on the wall to help.
Step 6: Cut all the pieces of insulation that are the same size and put them into the grid openings. Finish up by cutting insulation for all the odd-shaped places.
Step 7: Since your van floor probably has all sorts of weird angles with the wheel well and other minor shapes you might want to create a template for your subfloor out of cardboard, you can get large pieces of cardboard at local companies that manufacture boxes.
Step 8: After you have the template accurate, transfer it to the wood that you are using for the subfloor. Just follow along the outside of the template using a pencil onto the wood. Most likely, you will need to use more than one sheet.
Step 9: Using a jigsaw, follow the pencil mark to cut the subfloor into the appropriate shape. When cutting, try to be as exact as you can when you’re cutting out the wood or other material for the flooring.
Once you have the sheets cut to the precise dimensions of your van’s floor, try to fit them into the vehicle. They may be a little awkward to place alone, so if you have any trouble enlist the aid of a helper for this process, also make sure that you butt the sections together as close as you can get them when putting them down.
Step 10: Fasten the subfloor to the wood grid that you previously put down. In this step, this is where you will need the photo or the measurements that you took in Step 5. Make sure to use screws that are the right length. You only want to screw into the wood, not go all the way through the wood, and hit the van floor. So make sure the screws aren’t too long.
That’s all there is to it. You’ve now successfully installed insulation on the floor of your van.
Do You Have to Insulate the Floor?
When people think about insulating a van, the roof and walls are the first areas that come to mind. After all, the sun is hitting directly on those parts of the van. However, heat rises from the bottom of the van to the top. Also, the ground can put cold through the floor of your van, making it cold inside without insulation.
While it’s not necessary, insulating your van floor can make a huge difference in your comfort when you camp. In addition to helping to regulate the temperature, it will also add soundproofing to help cut down on external road noise and the empty sound, if you know what I mean, coming from the back of the van.
Another reason that you should consider putting insulation on the floor of your van is that it helps the effectiveness of the rest of the insulation everywhere else in the van. It is also beneficial because it helps cut down on the time it takes to heat and cool the van.
In short, floor insulation is essential if you plan to camp or travel with your van. It protects you from uncomfortable fluctuating temperatures and other issues.
Can You Insulate Any Van?
There are different types of vans that people use to go camping, traveling, and even live out of full-time. If you’re doing any long-term adventures out of the van, it’s a good idea to insulate it. Remember to follow the step-by-step guide above to help you get it installed correctly.
Insulation isn’t exclusive to any make and model of van. As long as you are careful about getting insulation in all of the spots that you possibly can, any van can have top-notch insulation in place to help prevent the fluctuating outdoor temperatures from being felt as much inside.
The cost of this project is going to vary depending on the size of the van you have.
If you have a small van with barely any floor space, then you won’t have to spend very much money at all. On the other hand, larger Transit and Sprinter vans can get a bit pricey, especially if you intend to insulate the entire van.
Regardless of the van that you have, it’s safe to say that you can insulate it. Make sure that there’s no rust since it can lead to problems down the road. You can remove rust by using a wire brush followed up with anti-rust paint. Leaving rust untreated can slowly destroy the metal of your van, leading to irreversible problems.
Dealing with Mold
Whether or not you have insulation in your vehicle, mold is bound to happen. The moisture from your breath will collect on the walls, the floor, and the ceiling overnight. You’ll have to have a few different tools at your disposal if you want to prevent or kill off the mold.
Here are the top five ways that you can deal with it:
Buy a mini dehumidifier and place it in your van. This small electric dehumidifier from Eva-dry is perfect for doing the job. It only draws 22 watts of power, and when the collection container fills up, it will automatically shut off. Just plug the dehumidifier in and turn it on, that’s how easy it is to set up. All you will have to do is empty the container now and then. One other thing to keep in mind is to put it in a secure location so that it won’t tip over during your travels and spill the water from the collection container.
Purchase a product like DampRid to help control moisture. This product is excellent for pulling moisture out of the air. It is non-toxic, easy to use, it is a natural way to remove moisture, and it is not that expensive. By eliminating excess moisture in your camper van, it will help to keep it from smelling stale or musty. For camper vans, here are two good choices: DampRid container with drop-in tablets or DampRid moisture absorber 4-pack. Just put them in a secure location so they don’t tip over.
Every morning (or any time that you see condensation building up on the windows), wipe everything down with a microfiber cloth or paper towels. You might also notice moisture on the metal surfaces on your van, which you should wipe up as well. Moisture and humidity are the main components of mold growth.
If you notice mold growing, spray the area with white vinegar, wait an hour, and wipe down with warm water. Vinegar is mildly acidic and thought to kill about 80% of the species of mold. You can also help prevent future mold by respraying the area and letting it air dry.
Open doors, windows, and vents regularly to allow the van to air out and reduce the chances of mold forming. The top way to deal with mold is to keep it in from happening in the first place, and having proper ventilation is going to be one of the best actions you can take.
We have a post that will give you some more tips on this common camper van problem “11 Ways to Stop Condensation When Sleeping in a Van.“
If you can run a couple of fans or install a roof vent, it will help you keep everything dry and aired out. In addition to this, you can lift or remove your mattress occasionally to let it air and dry out.

Common Installation Mistakes
Installing insulation is a challenging job if you’ve never done it before. It’s even more confusing if you’re not accustomed to using power tools and other equipment.
Fortunately, there are plenty of common mistakes that you can easily avoid. Check them all out below (and make sure you don’t do them!).
Not ordering enough insulation to finish the job. Measure the floor area and calculate how much insulation you will need. Some companies that sell insulation for vans will help you to figure out the amount if you don’t know how to do it. There is nothing more annoying than to wind up short and then have to wait a week or two to get what you lacked.
Leaving gaps is another issue that beginners might inadvertently do. Insulation is the most efficient when you have it installed everywhere. Don’t miss or skip spots because you think it is so small of an area that it doesn’t matter.
As mentioned in the section above, you can’t leave rust on the van floor, also while on the topic, the same applies to the van walls. If you have purchased a used van, check the van floor thoroughly to see if there are any spots where rust is beginning to show. If you do find rust, address the problem before proceeding. Repair any rust spots before moving on or have a professional fix it for you.
Make sure you don’t have too long of a screw when putting the subfloor down. Double-check the length of your screws, make sure they are the appropriate length. You don’t want the screw to go entirely through the wood and hit the van floor. If you are not sure, take a scrap piece of furring strip and a scrap piece of subfloor and test with a screw to make sure the screw doesn’t go all the way through.
Finally, remember to run any wires, plumbing, and any other things that need to be below the subfloor. There is nothing more annoying than to finish up and discover that you forgot to put something underneath the floor.
Helpful Installation Advice
Now that you’ve seen the steps to take and the mistakes to avoid, it’s time to learn a few useful tips that will make the process go along smoothly. Here are the three suggestions to cruise right through the installation:
Cover the wheel well with some type of flexible insulation product. There’s no other way to insulate this part of the van since it’s a thin piece of metal between the interior and the wheels right underneath.
Enlist the aid of your spouse or a friend to help with the project. The job will go faster, and you will have help holding things and lifting the subfloor when the time comes.
Kneepads come in handy for this job. You are going to be doing a whole lot of crawling around on the floor of the van, so this will make it easier.
Final Thoughts
Insulation is an absolute must when it comes to traveling or camping out of a van. With this guide, you’ll be able to cruise right through the entire process without too many problems. Everything that you need to know is directly above, so feel free to reference it if you have any questions.
Also, as a bonus tip, try to use brand-new wood. Used wood can have holes, rough spots, and maybe even mold. Buying the best supplies will give you the best results and longevity.
Installing insulation on the floor of your van is an upgrade that will help keep you warm when you are enjoying winter camping at your favorite ski area. This upgrade is not too hard or expensive, all you need to do is collect everything you need and a day or two to do the work, and you will finish up in no time.